
In this Topic Hide
You can use routes for planning and measuring distances. Routes can also be created in the PC application, and uploaded from a PC, and they can be emailed to your device to open in the app.
To create a route, you start by creating a single mark (great journeys start with a single step after all!). In the example shown above, the map is not shown for the sake of clarity.

Tap the Add Mark button
You will see your mark on the screen with the typical menu and drag handles. In the example shown above, we have created a mark called "P1".

To start creating the route, tap the mark's menu button. The Mark menu will appear.

Tap the Create Route button on the Mark menu. As soon as you do this, the mark is converted from a standalone mark, to a Route Point.
The route point is now shown as a single blue dot, and the Done button appears at the top of the screen.
Once you create a route from an existing mark, the mark is converted into a Route Point, and changes appearance to a default blue dot.
The mark's original name will be replaced, and as it is the first point in the first route will be called R1P1 (for obvious reasons). The route points CAN be renamed if you wish, but this may take a lot of time if you have a lot of route points in your route.
Tap the map to create additional route points in your route.
While you are creating the route, you can scroll and zoom the map, and change maps.
Tapping any route point will display the menu button and drag handle for that point, so the point can be moved, deleted etc.

The Done Button appears at the top-left of the screen. Tapping the Done button indicates that you have finished creating the route, and wish to exit route create/modify mode.


Don't worry too much if the route points are not exactly where you want them, as you can tap any route point, and use its drag handle to shift position later.
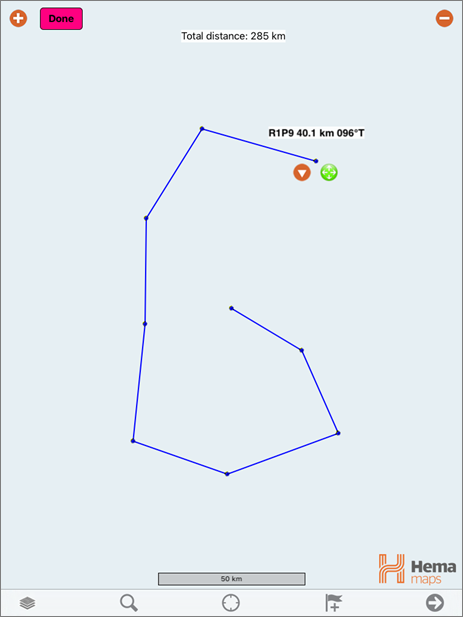
As you create or edit the route, the total distance of the current route is displayed at the top of the screen
While you are editing the route, tapping any of the route points shows its handle and menu button.
The name of the point and the distance and bearing from the previous point are displayed.
Tapping the menu button will display the Route Waypoint Menu
If you insert at the last point of the route, it allows you to continue adding points, extending the route, until you tap the Done Button.

From the menu you can modify the point you tapped, or you can perform functions which affect the entire route, such as
This option deletes the current route
Starts giving guidance from your current location to the start of the route. See below for more information.
Allows you to modify certain parameters related to the route, such as the name, line colour etc. More information is shown in the section below.

This option opens the Route Operations menu. The following sub-options work on the route as a whole:
As it says on the tin - this option will instantly flip your route. ie. the first point becomes the last.
This option uses an online service to generate a route which more closely follows the road geometry than a manually created route. Note that this function will only work to optimise routes which are less than 100 klm in length.

This option opens the Waypoint Operations menu. The following sub-options work on the waypoint with the route which was tapped to open the menu:
This option deletes the current waypoint from within the current route.
This option starts guiding you to the current waypoint
Adds a new waypoint to the route at this point. You can tap the route line at a point, and insert a new point where you tapped.
Allows you to edit the point as if you were editing a waypoint

It is easy to measure a distance and bearing with the Route tool.
Simply create a Mark, and drag it to the point you want to measure from.
Tap the blue menu button, then tap Create Route.
Touch the other point to place a waypoint, and tap it again to select it.
Drag to the exact point, and read off the distance and bearing displayed above the second mark.
When you are finished, tap the Mark Menu Button and tap Delete Route.
![]()
To navigate along a route, tap one of the route waypoints (most likely you would tap on the first waypoint in the list), then blue menu button, and select Follow Route.
The on-screen arrow pointer and navigation data on the flip side provides all the information you need to accurately follow the route.
Turn the device to landscape mode for more data.

If you wish to stop following an existing route, you can simply delete it from the Routes page, or tap on Cancel Navigation from the popup menu which appears when you tap a route point.
If you wish to keep the route for use another time, save it before deleting it from the Routes page.