In this Topic Hide
A mark (sometimes interchangeably referred to as a waypoint) is an overlay which is used to mark a single location on a map. Examples might be such things as a camping spot, a fishing spot, or a junction where a number of tracks meet.
This app generally refers to a standalone waypoint as a mark, whereas points which make up a route are referred to as waypoints.
You may find other apps and software refer to standalone points as waypoints, and points which make up routes as "route points".
![]()
To create a mark while viewing the map, simply tap the Add Mark Button on the toolbar at the bottom of the page. The mark will be created at the centre of the screen.

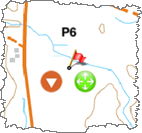
When you add a mark, the mark is displayed along with

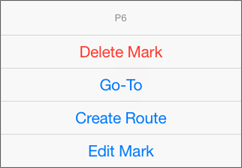
The Menu Button allows you to access specific options for this mark.

The Delete Mark button will remove the mark
The Go-To button will plot a course to this mark. To cancel the GoTo operation, delete the mark. If you wish to keep the mark permanently, save it to a file, which can be loaded later.
The Create Route button creates a route, with this mark as the first Route Point (referred to as a waypoint in this app). For further information, see the section on Routes in this User Guide.
The Edit Mark button will take you to the Mark Details page, where you can modify the properties of the mark.

The Drag Handle allows you to move the mark around the screen, by tapping and dragging on the handle. Lift your finger off the screen once you have the mark positioned where you want it.
Once marks are created, they will appear on the Marks List page.
Locking a mark or marks is a way of avoiding inadvertent changes to the locked items.
If you have previously locked all of your marks using the Lock All Marks menu item from the Marks Page, or locked an individual mark from the mark's Edit page, any locked marks on your device will appear with a red lock handle displayed in place of the normal green drag handle, as shown below.

Mark shown with locked position handle

If you wish to move the mark, tap the red Lock handle.
A popup will appear asking if you wish to unlock the mark so as to move it, as shown here:

Tap the Unlock button to unlock the mark.
Note that once you have locked all marks, you can unlock marks individually, or unlock all of them using the Unlock all option from the Marks menu.

Mark shown with unlocked position handle
Once unlocked, the mark can once again be freely dragged around the map by tapping and dragging the green Drag handle.