What's In this Topic Hide

Tap the Settings button to open the Settings screen.
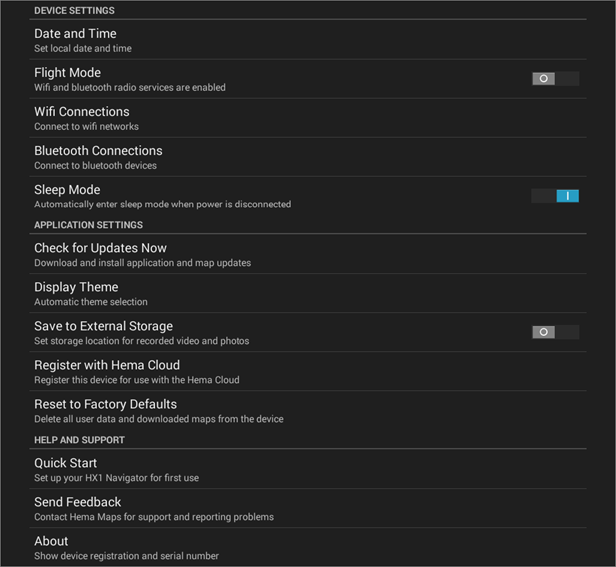
The Settings screen allows you to change some of the parameters which affect the way your Navigator performs.
Some of the settings are accessible directly under the main Settings screen, whereas others are accessible from their own sub-screen, which itself is accessible from the main Settings screen.

The Nav button appears on the Home screen in its fixed location, and on other screens in whichever position you choose to place it,
A SHORT TAP on the Nav button will return you to the previous screen at any time.
A LONG TAP on the Nav button will pop up the Nav pane, where you can access Navigator device settings, etc.
The button can be dragged to any position on the screen of your choosing, and will remember its location on that screen.
Note that in some of the screenshots seen in this eGuide, the back button has been removed from the image for the sake of clarity.
Settings are split into a number of categories
The following sections explain these settings in detail.

The Date and Time button opens the Date & Time Settings screen. By default, the HX-1 is configured to get automatic time updates directly from the GPS system.
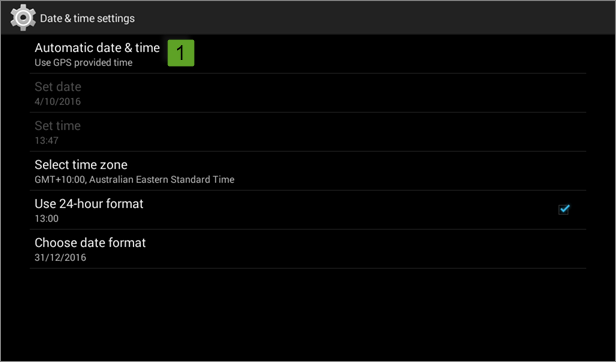
The options available here are:
Automatic date & time
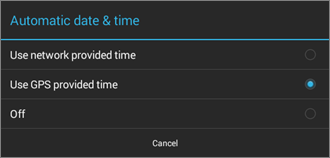
When this option is selected, you have a number of sub-options.
Use the time as broadcast by the network your Navigator is currently connected to
This is the default option
Use the time broadcast by the GPS satellite constellation. This is likely the best option, and will give the most accurate results.
Turns off automatic date & time setting, in which case the manual options on the Date & Time Settings screen will be used instead.
Set Date
Set Time
The two options above are only used when you are not using either network or GPS provided automatic date & time setting. These options are NOT available when the date and time are being set automatically (either from a GPS or network source).
Each of these options allows you to manually set the date or time.
Select Time Zone
Choose which time zone you are using your device in
Use 24-hour format
If you prefer military format time (ie. 17:00 for 05:00PM), choose this option
Choose date format
Allows you to choose what format dates are presented in.

Default is OFF
Flight Mode turns off the Bluetooth and WiFi radio systems in the HX-1. This can be a quick way of instantly turning off all signal generating parts of the HX-1 (ie. useful when travelling on domestic airlines, hence the name). Slide the switch to the ON position, shown at (1) above to activate Flight Mode.

These settings are where you can configure and manage your WiFi connections.
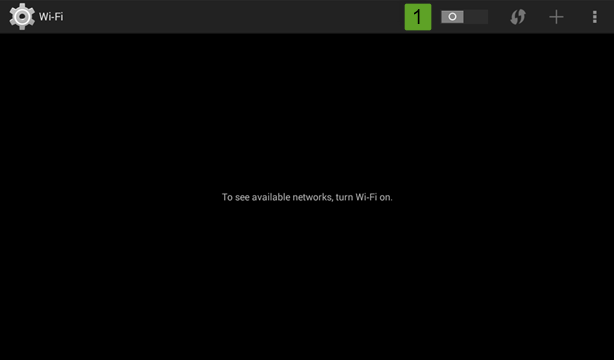
Default is OFF
WiFi must be switched on for connections to be possible. Make sure that the switch at 1 above is ON before trying to connect to your WiFi access point.
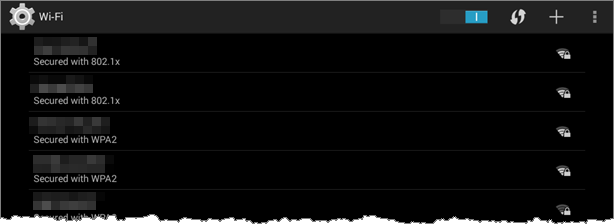
After switching WiFi on, the HX-1 will scan for available WiFi networks, and will then display a list of WiFi networks to connect to, as shown below (actual access point names blurred).
Configuration of your WiFi access point or hotspot is outside the scope of this user guide.
This guide assumes that the access point you are connecting to has been correctly configured, and that you know the password required to gain access to your chosen SSID / access point.
Tap a specific SSID to connect to it. Enter any password or security data required by the access point.
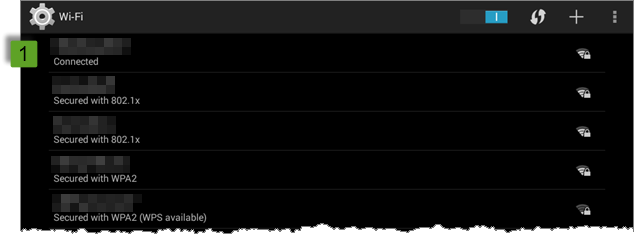
After connecting successfully, you will see a screen similar to that shown below (access point names blurred). Note that the HX-1 is now connected to the selected WiFi access point, as shown at (1).
Other buttons on the WiFi Settings screen are:

WPS connection button
Use this button to connect to a WiFi access point which has the WPS (WiFi Protected Setup) functionality included. WPS allows you to connect by pressing a button on the WiFi access point / router to initiate a WiFi connection between the device and the HX-1. Familiarise yourself with the documentation for WiFi access point before using WPS to connect.

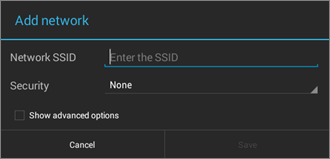
Add button
Manually add a new WiFi network. This option would be used where your WiFi access point does not advertise any SSID.
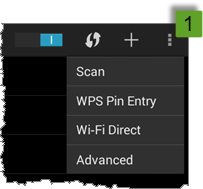
WiFi menu (1 above)
The drop-down WiFi menu gives you access to more advanced WiFi options.
Tap the Advanced button to see the Advanced Wi-Fi settings screen as shown below. The options are described below.
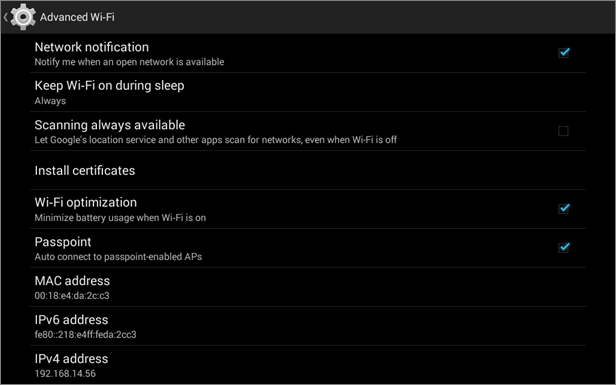
Network notification
This option toggles notifications whenever an open WiFi network is detected.
Turn this notification off if the notifications become annoying.
Keep Wi-Fi on during sleep
This option selects whether to keep the Wi-Fi subsystem active while the device is asleep.
Tapping this option will display a number of further options to choose from.
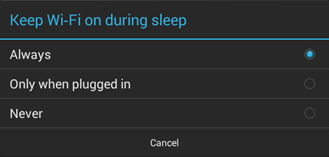
Always
Always keep Wi-Fi active while the device is sleeping
Only when plugged in
Only keep Wi-Fi active if the device is plugged into an external power source
Never
Do not keep Wi-Fi active while the device is sleeping
Keeping Wi-Fi active while the device is asleep will consume more power than if it is switched off. If battery life is of concern, set this option to Never.
Scanning always available
Switching this option on allows specific system apps (such as Google Location Services) to continue scanning for Wi-Fi networks, even when the Wi-Fi is switched off.
Install certificates
This options allows you to install a certificate which has been copied to your device, if a certificate is required to provide Wi-Fi network access.
Wi-Fi optimization
This option is designed to reduce battery usage by the Wi-Fi subsystem. The effects are minimal.
Passpoint
Passpoint enabled access points are designed for quick connection (They are often used for free / open Wi-Fi access). Enabling this option will cause the HX-1 to automatically connect if a PassPoint enabled access point is detected.
Some of the options displayed on this page are purely informational, such as:
MAC address
The network hardware address of your device
IPv6 address
Shown if your device has been assigned an IPv6 address by the access point once connected
IPv4 address
Shown if your device has been assigned an IPv4 address by the access point once connected
When travelling you may want to access the internet using a public WiFi hotspot. For example some well known hamburger chains offer free WiFi at their outlets. Many motels, shopping centres, caravan parks, etc. also offer this type of service to guests.
When you try to access WiFi using one of these types of services, often there is an additional "hoop" to jump through to gain access to the free WiFi.
Normally, connecting to a WiFi network requires selecting the SSID to connect to, and entering a password, and then you are connected.
To access the free WiFi offering, you usually connect without a password, then you are connected to the network, after which you will be redirected to a web page where you may have to enter other information, such as your email address.
To enable this facility click the Public Access Wifi Sign In option on the HX-1 Settings screen.
If you have not used this option previously, you will see the screen shown below.
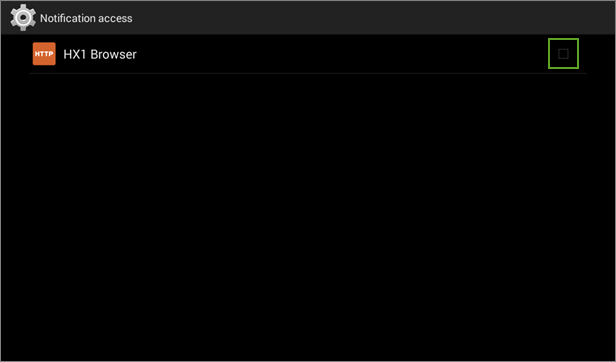
You must tap the tick box to enable the internal web browser functionality which can handle the web interface component of the free WiFi login process.
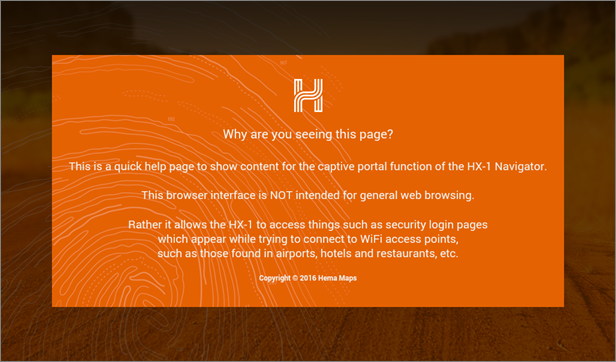
This internal web browser is NOT designed or capable of being used for general web browsing duties. It is a simple browser interface specifically for use in the scenario described above.
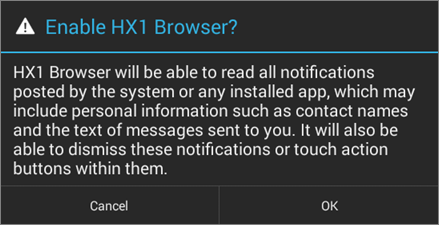
After tapping to enable the HX-1 browser option, you will be prompted to confirm that you wish to do so, as shown below.
Once you have enabled the browsing capability, you will see a quick help page, as shown below.

Tapping the Bluetooth Settings button opens the Bluetooth screen, where you can configure your Bluetooth settings.
This is discussed in detail in the Bluetooth section of this eGuide.

Opens the Accessibility settings screen, covered in the Accessibility settings section of this eGuide.

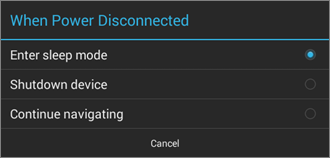
The options are
Enter sleep mode
This will cause the device to sleep once the external power source is disconnected (explained fully below).
Shutdown device
Causes the HX-1 to switch off completely when external power source is disconnected.
Continue navigating
When this option is selected, removing the external power source will do nothing.
If sleep mode is OFF, the device will stay powered on even when the external power source is removed.
When the HX-1 is in sleep mode, it will consume a small amount of power, and will therefore reduce the battery charge over time.
(think of this as similar to when your TV is in standby mode)
When sleep mode is ON, the device will prompt you for action when external power is removed.

By default, the HX-1 will shutdown after a 30 second countdown. You can also tap one the options on the prompt dialog:
Cancel
Do not enter sleep mode, but continue doing what you were doing.
Sleep
Enter sleep mode immediately (ie. bypassing the 30 second countdown).
Shutdown
Close down the HX-1 and power off completely.

The Check for Updates Now option checks the servers for any new content and application updates, then performs pending updates
The HX-1 automatically checks for updates very shortly after starting up, providing an internet connection is available.
This option can be used to perform an update check at any time.
Updates may consist of changes to the firmware (or operating system) of the HX-1, or new versions of one or more of the apps which provide the functionality of the HX-1.
When new updates are pending, there may be one update only, or there may be a number of updates released together in a batch.
Whichever situation is the case, the HX-1 will manage the download and the installation of the update(s) as required.
When you tap the Check for Updates Now button, the HX-1 will contact the update server to see if there are any updates required.
It will prompt you to confirm this action via a dialog window as shown below.

Tap the OK button to confirm that you wish to check for updates.

If the Update Manager determines that there are 1 or more updates available, it will download them directly to the HX-1, and display a message to that effect, as shown at (1) below.

If there is no internet connection present, you will see a warning message as shown at (1) below, and the update check will not continue.
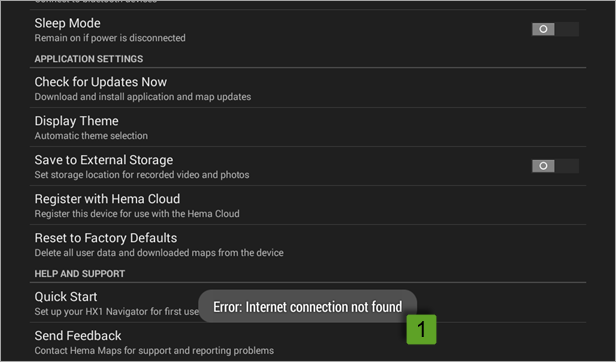
If the update check determines that there are no updates pending a brief message will display on the screen, as shown at (1) below.
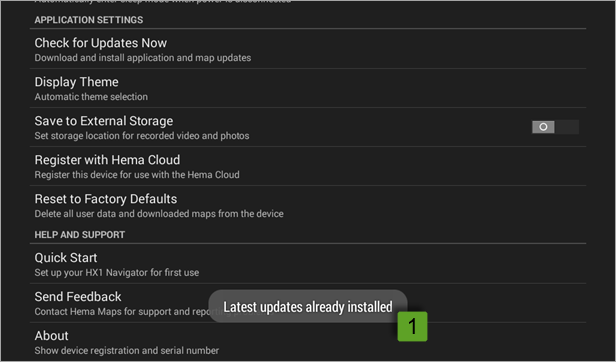
Once an update has been downloaded to your HX-1, the update manager will prompt for installation of each update package which has been downloaded.
The screenshots below show the process of updating an app via the update manager.
The update manager will display a prompt for each package which requires update, similar to that shown below.
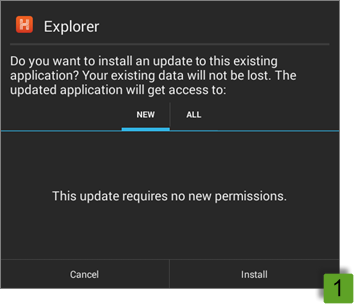
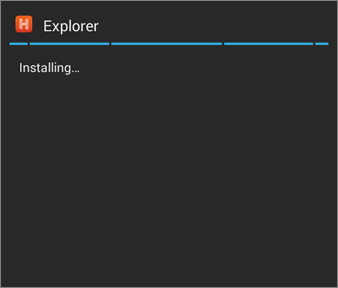
Tap the Install button (1) to begin the update process for that app. The update manager will begin the app installation process, and display a dialogue window similar to that shown below while the installation is proceeding. Tap the Cancel button if you'd prefer to do the update later.
Once the app install process has completed, the update manager will display a dialogue window similar to that shown below.
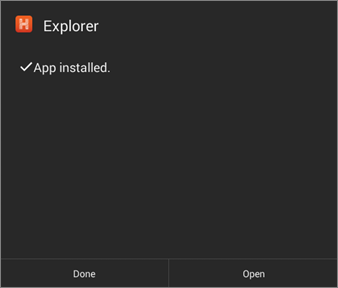
Tap the Done button to complete the update for the app.
While there is generally no harm in tapping the Open button after updating an app, it is recommended to only tap the Done button after each update completes.
Once all updates are complete, it is recommended to perform a reboot of the device to ensure a clean startup with the latest version of all apps is running.

Tapping the Display Theme option allows you to choose which mode is used for the screen display.
The mode is essentially a "theme", either day or night mode.
Night mode is a more subdued theme suitable for viewing during night hours, but your personal preference may vary.
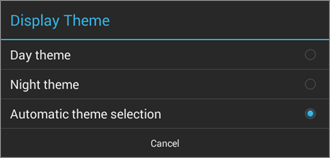
You can manually set the option to your choice, or allow the HX-1 to set the screen mode automatically, based on the sunset / sunrise time at your present location.

Default is OFF
This option sets the default location for the storage of videos and photos captured by the Media tools.
Slide the switch as shown at (1) above to turn this option on or off.
If the option is on, the HX-1 will use an SD card (not supplied) to store your captured media (images and videos).

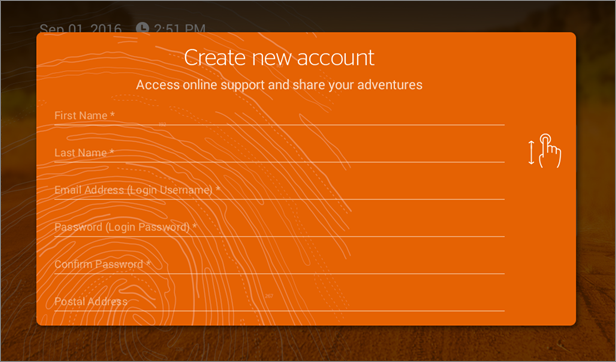
Here, you can register your device with the Hema Cloud.
When you originally started up your HX-1, you ran through the onboarding process, part of which was to use this same screen to create your Cloud account. If you skipped that part of the onboarding process, you can do it at any time using this option off the Settings screen.
Registering a Cloud account grants you access to several additional features within the app, such as:
Tapping the button opens the Create new account screen.
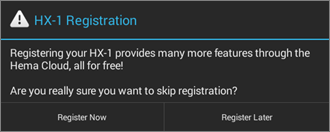
If you change your mind, and tap the REGISTER LATER button, you will be prompted to confirm your action, as shown below.
If you try to register your HX-1, and it is already registered, you will see a message indicating that this is the case, and displaying the current user, as shown below.
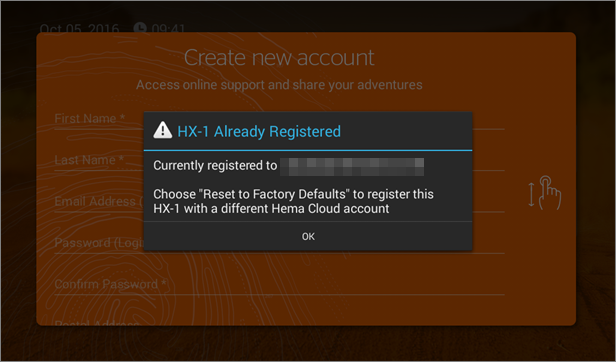
If you wish to register with a different account, you will need to factory reset your HX-1 to remove references to the old account before creating / registering your new account.

This option deletes all user data and downloaded maps on your device, and returns the unit to the same state it was in when first removed from it's packaging. If you select this option, you will be prompted to confirm that you wish to continue.
Performing a Factory Reset will NOT do anything to an SD card which happens to be in the HX-1 at the time of the reset.
The Factory Reset will ONLY clean the internal storage of the device.

Tapping the OK button will factory reset your device.
Be sure that this is what you want to do before tapping the OK button, as there is no way to retrieve your data and settings once this option is used.

This option allows you to go through the Quick Start process which normally occurs when you start the HX-1 for the very first time.
See this section of this eGuide for details of the Quick Start process.

This option allows you to compose a message (up to a maximum of 2000 characters), which will be sent to the Hema Tech Support Portal.
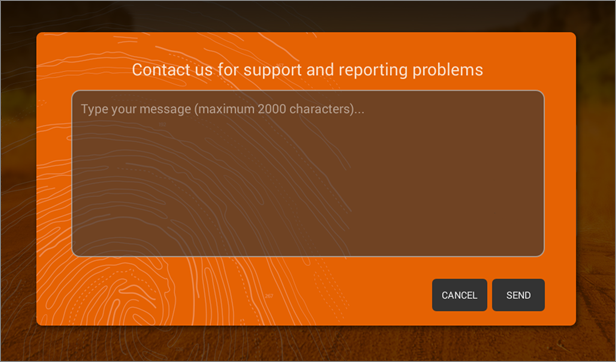
After entering your message, tap the SEND button to transmit your message to the server.
Tap the CANCEL button if you do not wish to continue. This will close the Feedback screen and return to the Settings screen.

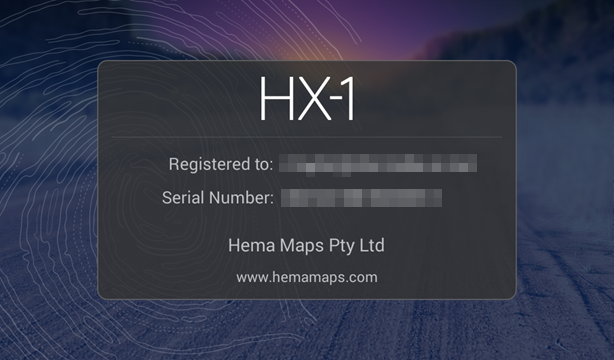
This option shows the current registered owner and serial number of your HX-1 device.
(The owner and serial number have been blurred in the image below.)
