Bluetooth Menu
What's In this Topic ShowHide
The Hema HX-1 Navigator
allows you to connect with a compatible device to output sound (which
usually comes out of the internal speaker) to an external device.
The external device would normally have an amplifier and speakers of
it's own (ie. such as a car audio system, headphones, or a Bluetooth speaker).
Bluetooth wireless technology provides for a number of profiles, which
specify certain aspects and behaviour of Bluetooth wireless connectivity
between different devices.
There are many profiles associated with the Bluetooth technology; two
of the most common seen in vehicles these days are:
- HFP - Hands Free Profile
- A2DP - Advanced Audio Distribution
Profile (or Bluetooth Audio Streaming)
The HX-1
provides support for the A2DP profile only, which allows for the audio
output of the Navigator
to be sent to a device capable of receiving streaming audio (such as a
car stereo head unit, or Bluetooth speaker).
In the Bluetooth world, when talking about two devices, generally one
device is a master, and the other device is a slave.
For the connection to work, first the two devices needs to be PAIRED.
Pairing Bluetooth devices establishes a connection between them, often
with the use of a numeric code acting as a password. The passcode is often
fairly generic by default, but can be customised by the user to provide
more security.
Once the two devices are paired, they need to be CONNECTED
to actually provide the service required. Generally, a device can be paired
to many other devices providing the same profile or service (such as media
streaming or hands-free), but you can only be connected to one device
for that profile at a time. ie. you can have a whole bunch of devices
paired, but only one active connection at a time.
With the A2DP profile, one device acts as the master (or source or sending)
device, and the other is the slave (or target or receiving) device.
In this case, the Navigator
is the sender, and the device which outputs the audio is the receiver.

The Nav button appears on the Home
screen in its fixed location, and on other screens in whichever
position you choose to place it,
A SHORT TAP on the Nav button will
return you to the previous screen at any time.
A LONG TAP on the Nav button will
pop up the Nav pane, where you can access Navigator
device settings, etc.
The button can be dragged to any position
on the screen of your choosing, and will remember its location
on that screen.
Note that in some of the screenshots
seen in this eGuide,
the back button has been removed from the image for the sake of
clarity.

Tap the Bluetooth Settings button
on your Navigator
Settings screen to enter the Bluetooth configuration screen.
The first step in getting the Navigator
connected with the target device is to put the target device into Bluetooth
discovery mode. This means that the device will broadcast or advertise
itself as being capable of providing certain services.
Usually, when you set the device to be discoverable, you can set a duration
to be in this mode. ie. 1 minute, 2 minutes, etc.
The method used to configure the target
device will vary depending upon the specifics of that device.
The basic process is usually the same,
but the exact process by which you arrive at your required configuration
may vary.
You should familiarise yourself with
the process on the target device before attempting to configure
this connection.
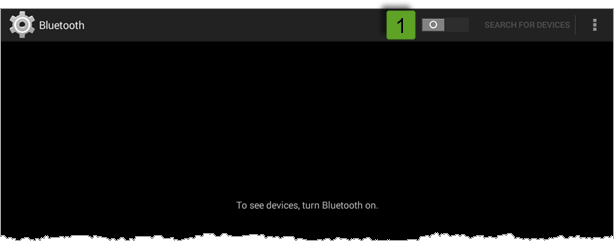
When you first enter the Bluetooth Settings screen, Bluetooth is usually
switched off, and no Bluetooth devices will be visible as shown below.

Tap the Bluetooth on / off button as shown at (1)
above to enable Bluetooth on your HX-1.
While the target device (the device you want to connect to) is in the
Bluetooth discovery mode, tap the Search
for Devices button (at 1
above) at top-right of the Bluetooth screen to search for and find the
discoverable target device.

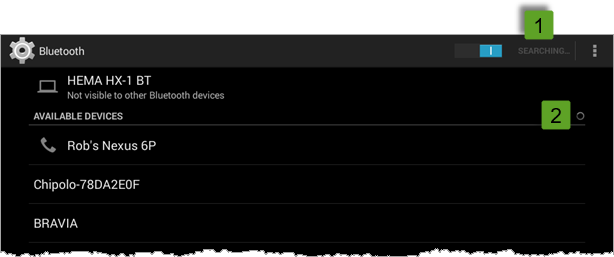
While the Navigator
is searching for nearby Bluetooth devices, you will see indicators displayed
on screen (as shown at 1 &
2 above).
If your device responds to the Bluetooth request, it should appear under
Available Devices on the HX-1
Bluetooth screen, as shown above.
When you tap the desired target device to pair with it, you may be prompted
for a passkey applicable to that device.
This is dependent on the device you are connecting to, and may or may
not be required before you can pair with the device in question.
Enter the key, and the Navigator
should pair with the target device. You should see an indication that
the HX-1
is attempting to pair with the target, as shown below.

Once pairing is successful, you should be able to connect with the target
device.
Once pairing has been successfully
achieved with a given device, the Navigator
will remember the settings required to connect to that device.
Pairing again should only become necessary if something changes
on the other device (ie. the other device's name or passkey is
changed, etc.).
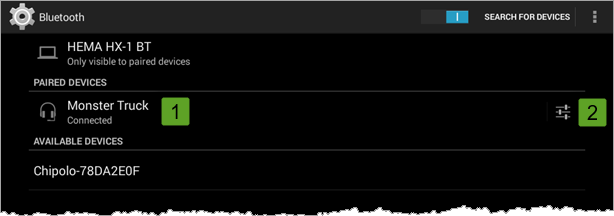
Tap on the device name under Paired Devices to connect, and you should
see that the paired device is now successfully connected, as shown at
(1) below.

Depending on the target device, you may also see a Settings button,
as shown at (2) above. The Settings
button allows you to make some changes to the entry related to the target
device on your Navigator.
The settings and options available will be dependent on the target device's
capabilities, but an example of what these settings might look like is
shown below.

A typical option is one which allows you to rename the target device.
For example, you may have two vehicles whose Bluetooth ID defaults to
"My Car". If you have paired with both vehicles, you might see
two entries for "My Car". This may be confusing.
So, you might rename one entry "My Blue Car", and one "My
Red Car", so that you know where you are.
You might also no longer have the paired device (you might have sold
the device, for example), so you might not wish to keep the old device
around. You can tidy things up by using the Unpair
option in this case.


