In this Topic Hide
The app is capable of displaying a variety of textual information, and you can customize the data fields displayed to show the data which is relevant to your style of use.
Some people just want to record their trip, and see the distance travelled, while others want to know, for example, velocity-made-good as they are navigating towards a mark.
The locations where data fields can be positions are referred to as "cells", and there are cells on the main screen (one in each corner), and a "matrix" of cells on the flipside screen.
There is an independent layout for portrait and landscape display modes - that is, there are 4 separate screens of information that you can customize the layout for.
The default layout selects trip-recorder-related data in portrait mode and navigation-related data in landscape mode.
The data fields (or cells) which display data within the app can be customised in two ways:
The app can display cells containing data fields in two places:
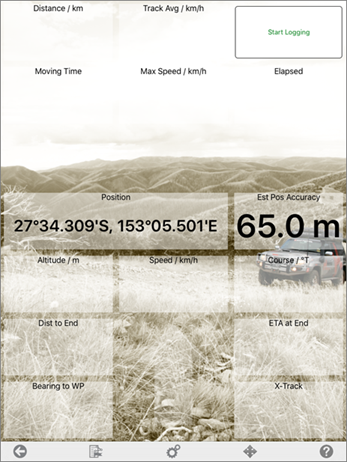
By default, the app has a standard layout of data cells on the main map page and the flipside page.
When you go to the flipside page it will look like this:

As you can see, the page consists of a matrix of cells, each displaying a piece of GPS related data.
If you wish to change what is displayed in a given cell, tap-and-hold on the cell. After a couple of seconds, The Data Item menu will popup, as shown below:
You have two options for the data cell that you are modifying:
Clear cell
This will remove whatever data field value is assigned to that cell, effectively creating a blank cell in that location.
Change Data
This option allows you to choose which data field to display in that cell location.
When you tap this option, you will see the Change Data screen, which allows you to choose from the data fields shown in each category.
Tap a category folder to open the category allowing you to view the fields available in that category. Tap to select the data field for the cell you are currently changing.
Tap the Cancel button at upper-left if you change your mind, and which to exit the screen without making any changes.
If you wish to modify the data field used for any of the cells on the Main Map page, use the Arrange option from the flipside page (as described in the following section).
![]()
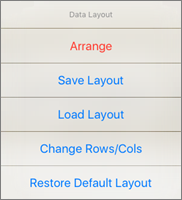
Tapping the Data Layout button from the flipside page opens the Data Layout menu.
The Data Layout menu contains options allowing you to customise the layout of the data fields on the main map page, and the flipside page to suit your purposes.

The Data Layout menu contains the following options (see the section below this for more detailed information on each option):
Arrange
Allows you to move and/or resize any of the data cells on the flipside page, or the main map page.
This also allows you to customise the data fields used for the cells on the main map page.
See below for more details.
Save Layout
Once you have arranged the layout and customised the data fields for each of the cells to your satisfaction, you can save the layout with a name for easy retrieval later. ie. you might have one layout which suits your purposes in one type of environment, and another that suits a different method of driving, or you may find that each person who uses the app while travelling prefers their own layout.
See below for more details.
Load Layout
Allows you to load a previously saved layout.
See below for more details.
Change Rows/Cols
This option opens the Change Rows/Cols sub-menu, which allows you to add and remove rows (across) and columns (down) the flipside page. Of course the more rows and columns you have, the smaller they will be, so there is a sensible limit (depending upon your screen size, etc.) after which the number of rows or columns will be too small to be of practical use.
The options available in the Change Rows/Cols menu are pretty self-explanatory.
Restore Default Layout
This option simply returns the layout to the original layout in use when the app was first installed on your device.
Tapping the Arrange option puts the app into Arrange mode.
While the app is in arrange mode, you can tap a cell to show the cell's drag and resize handles, as shown below.
Drag the cell to a new location in the matrix on the flipside page by tapping-and-holding over the 4-way drag arrow.
Tap-and-drag the resize handle at the lower-right corner of a cell to resize that cell. If you resize one cell over the top of one or more other cells, these cells will be forced to move to another location to accommodate the resized cell.
You can also change back to the Main Map page and change the data fields associated with the four corner cells on that page. While you are in arrange mode, the Main Map page will appear as in the example shown below (note that some screen elements have been removed for clarity):

Note that each of the four corner cells has a handle visible. Tap this handle to select a data field for the cell from the Change Data page (see above).
When you have finished arranging the cells they way that you like, you can tap the Done button on the main map page.
![]()
You can also tap the Data Layout button on the flipside page, and tap Done arranging from the Data Layout menu to close arrange mode.
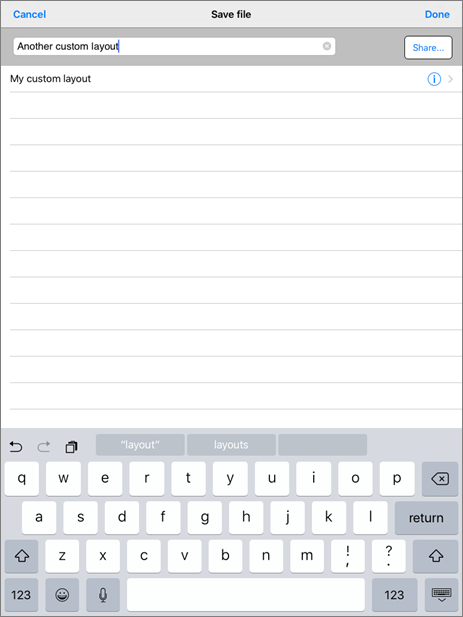
The Save Layout option allows you to save the current layout with a name so it can be reused at any time. Tapping the Save Layout option opens the Save File screen. Enter a filename for your layout, and tap the Done button to save the layout.


Tapping the Info button on an existing layout allows you to delete the selected entry. If you choose to delete the entry, you will be prompted to confirm the action as shown below.

Tap the Cancel Button to return to the previous screen WITHOUT saving your changes.
Tap the Done Button to return to the previous screen, saving your changes.
Tap the Share button to send your layout to someone else, via the normal sharing options at your disposal.
The Load Layout option allows you to re-load a previously saved layout.

You will see a list of previously saved layouts. Tap on a layout to load it.
Remember, if you have customised the current layout, and not yet saved it, and you load a previously saved layout, you will lose your latest customisations when the saved layout is opened.
There are numerous data fields from multiple categories which can be displayed, as listed below.
Satellites
Displays the number of satellites used, visible, and signal strength
Average Speed
Displays the calculated average speed of travel
Average Course
Displays the average direction of travel as determined by the GPS
24h Time with seconds
Displays the current time in 24-hour format with seconds
Time
Displays the current GPS time
Altitude
Displays the current altitude as determined by the GPS. (Altitude vs. Elevation)
Accuracy
Displays the calculated HDOP (horizontal dilution of precision) from the GPS data. HDOP is the estimated error between the given position and your actual position
Position
Displays your current position in the format selected in settings
Speed Over Ground
Displays your speed over the ground (actual progress). This may differ from your airspeed or nautical speed due to things such as headwinds or currents
Course Over Ground
Displays your actual direction of travel relative to the ground. On a craft (air or sea) this may be different from the actual direction your craft is pointing
Compass Heading
Displays your compass heading
Max Speed
Displays the maximum speed you have reached on the current recorded track
Average Speed
Displays the average calculated speed on the current recorded track
Time Not Moving
Displays the amount of time since the last recorded movement (less than .1 mph)
Elapsed Time
Displays the amount of time elapsed since the start of the current recorded track
Moving Time
Displays the amount of time elapsed during the current movement (since the last period of "time not moving")
Distance Travelled
Displays the distance travelled during the current recorded track
Logging Button
Displays a button to enable / disable logging of the GPS data
Logo
Display a Logo of your choosing in this data field
Blank
Leaves the field position blank
Hint to change data
Display a message indicating that the data fields can be changed
Waypoint Name
Displays the name given to the active waypoint
Turn After Mark
Displays the bearing to the next mark after the current active mark
VMG Towards Mark
Displays the VMG (velocity made good) toward the active mark
VMG Parallel to Leg
Displays the VMG (velocity made good) relative to the active leg (straight line between the last mark and the active mark)
ETA End of Route
Displays the ETA (estimated time of arrival) to the end of the active route
Time to Route End
Displays the amount of time remaining (at the current average speed) to reach the end of the route
Dist to Route End
Displays the distance remaining from the current location to the end of the current route
ETA Next WP
Displays ETA (estimated time of arrival) to the next waypoint
Time to Next WP
Displays the amount of time remaining (at the current average speed) to the next waypoint
Arrow
Displays an arrow showing direction to the next waypoint relative to the unit's compass
Crosstrack
Displays the crosstrack error. This is the distance between your current position and the closest point on a straight line from the last waypoint to the active waypoint
Turn Angle
Displays the angle of turn between your current bearing and the bearing to the next waypoint
Bearing
Displays your current bearing (direction of travel)
Distance
Displays the distance travelled on the current route
Engine RPM
Average Rudder Angle
Rudder Angle
Water Temperature
Depth of Water
True Wind Speed
True Wind Direction
Apparent Wind Speed
Apparent Wind Angle
Boat Speed
Compass (mag)